And so the test build has begun....
I started by cutting out and assembling the wing formers. Save for a minor problem cutting out the slots, everything went along smoothly. I must confess though. I used more than the usual amount of CA glue to stiffen the wing spars.
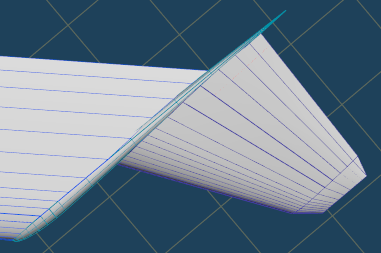
Here's how the wing is 'wrapped' around the wing formers. Pretty good fit! :)
Here's how the wing tip is wrapped around its formers.
Wing, nacelle and wingtip ready to be put together!
The nacelle is first attached to the wing. The nacelle fits rather well. Unfortunately, the nacelle was a bit hard to assemble...
Finally, here's what the completed wing looks like.
That's all for now I guess....
My blog about my hobby, card modeling. If you're into this kind of hobby, feel free to look around. My card model interest focuses mainly on Axis WW2 aircraft, Luft'46 models in particular.
Monday, September 27, 2010
Sunday, September 19, 2010
Blohm und Voss P.212.02 - part 05
Done with unfolding via Pepakura! I was expecting another unfolding nightmare like that of my last model (Heinkel P.1078b). Surprisingly, this one unfolded pretty well. I guess the simple fuselage shape and the constant chord wings made unfolding easy.
Here's a preview of how the parts will look like:
Yarrrr!!!! Thar bee cone petals on the engine spinner and the wing nacelles! A necessary evil, I say. Yarrr!
Unfortunately, the weekend is over. I'll have to wait till next weekend to do that test build.
Here's a preview of how the parts will look like:
Yarrrr!!!! Thar bee cone petals on the engine spinner and the wing nacelles! A necessary evil, I say. Yarrr!
Unfortunately, the weekend is over. I'll have to wait till next weekend to do that test build.
Labels:
aircraft,
blohm und voss,
card model,
design,
luft46,
P.212.02
Sunday, September 12, 2010
Blohm und Voss P.212.02 - part 04
I can't believe how slow my progress is! I must pick up the pace one way or another...
Anyway, here's what I have so far.
First, the nacelle at the wing tips.
If you recall from my previous post, the nacelle was a bit 'fat'. In fact, it looked more like a fuel tank! According to the 3-view diagrams over at the Luft'46 site, the nacelle should have been 'flush' with the wing tip.
And so I labored for many hours trying to find the best way to make the nacelle fit the open edge of the wing tip.
And here's what I got:
So far so good! Much better than the previous design. Most of the time spent for this was to align the segments of the nacelle with a corresponding segment on the wing. Doing this will help Metaseq produce a cleaner result by the time I do a boolean operation (Wing minus Nacelle).
Now my problem is that the nacelles are a bit on the narrow side. Almost like landing gear struts. If this ends up being hard to assemble, I may bump up the scale to 1:32. For now, I'm sticking with 1:48.
Next, I spent the rest of the weekend making the formers:
The fuselage formers (yellow) were relatively straightforward to make. Unfortunately, I can't say the same for the wing formers. The wing formers required a lot of work. Due to the dihedral of the wing, I couldn't just slice away with the knife tool to make the spars. I had to do some basic trigonometric calculations to derive the wing angle. Once I got the angle, I created a couple of plane primitives, which I then tilted to intersect the wings at 90 degrees. After that, I did a boolean operation to intersect the tilted plane with the wing to produce the cross cut which would later be used to make the spars.
Boy... I guess my high school trigonometry class had some use after all! Hehehehe.
Anyway, here's what I have so far.
First, the nacelle at the wing tips.
If you recall from my previous post, the nacelle was a bit 'fat'. In fact, it looked more like a fuel tank! According to the 3-view diagrams over at the Luft'46 site, the nacelle should have been 'flush' with the wing tip.
And so I labored for many hours trying to find the best way to make the nacelle fit the open edge of the wing tip.
And here's what I got:
So far so good! Much better than the previous design. Most of the time spent for this was to align the segments of the nacelle with a corresponding segment on the wing. Doing this will help Metaseq produce a cleaner result by the time I do a boolean operation (Wing minus Nacelle).
Now my problem is that the nacelles are a bit on the narrow side. Almost like landing gear struts. If this ends up being hard to assemble, I may bump up the scale to 1:32. For now, I'm sticking with 1:48.
Next, I spent the rest of the weekend making the formers:
The fuselage formers (yellow) were relatively straightforward to make. Unfortunately, I can't say the same for the wing formers. The wing formers required a lot of work. Due to the dihedral of the wing, I couldn't just slice away with the knife tool to make the spars. I had to do some basic trigonometric calculations to derive the wing angle. Once I got the angle, I created a couple of plane primitives, which I then tilted to intersect the wings at 90 degrees. After that, I did a boolean operation to intersect the tilted plane with the wing to produce the cross cut which would later be used to make the spars.
Boy... I guess my high school trigonometry class had some use after all! Hehehehe.
Labels:
aircraft,
blohm und voss,
card model,
luft46,
P.212.02
Thursday, September 2, 2010
Blohm und Voss P.212.02 - part 03
A little fine tuning on the wheel wells just to make sure they're big enough to accomodate the landing gears.
Note that the front landing gear has to twist 90 degrees before folding in. This due to the space occupied by the engine intake tunnel. On later jet designs, the intake will bifurcate to accomodate the pilot space and the landing gear. (e.g. Mig 15)
Labels:
aircraft,
blohm und voss,
card model,
design,
P.212.02
Monday, August 30, 2010
Blohm und Voss P.212.02 - part 02
Done with the wheel wells and landing gears.
Here are some pictures:
Next step, boolean operations for the Wings!
Here are some pictures:
Notice how the engine intake tunnel is visible from the rear wheel wells. Man..that was tough to make in Metaseq!
Next step, boolean operations for the Wings!
Labels:
aircraft,
blohm und voss,
card model,
design,
P.212.02
Sunday, August 29, 2010
Designing Wings Using Metaseq's Magnet Tool
Though they look relatively easy and straightfoward, I find the wings to be the trickiest part of the plane to design. What makes wing design hard for me is coming up with a good and smooth teardrop shape of the wing's chord.
In the past, I used to make wings using this method:
I start by creating a cylinder primitive with enough lateral segments to provide a smooth shape.
Then, using the scaling tool, squash the cylinder. This will produce what appears to be a wing. Close enough.
The next steps would be to reshape the cross section of the cylinder to produce the much sought after tear drop shape.
I start by getting rid of some segments at the rear of the wing. This is done by "joining" their vertices to the right most vertex. Arghh..hard to describe. Just look at the picture above. :)
Continue shaping the cross section (or chord) by moving the last segment pictured above a bit to the right. Then, using the scaling tool, scale down along the Y-AXIS to make the chord taper down smoothly.
Finally, move down the segments pictured above to refine the chord into the desired shape.
Simple eh?
Unfortunately, this technique relies a lot on a good eye to ensure that the chord tapers "naturally". Often times, you'll end up with something like this:
If you don't do a good job at aligning the segments of the cross section, you'll end up with a wing chord that looks like the picture above. Not really nice.... However, I'm not saying that the technique described above is flawed. I'm just saying that it's easy to make mistakes.
In my Heinkel P.1078B, I explored using Catmull-Clark patches for creating a smooth chord. It did its job well, but unfortunately, I had limited control on the number of wing segments. As a result, the leading edge of my Heinkel's wing is not very smooth.
Enter the Magnet tool!
Start with a cylinder primitive. This time, use more segments. This will help produce a smoother chord.
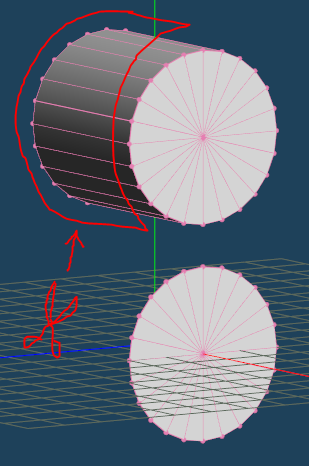
Now, delete the rear end of the cylinder as pictured above. Actually, what I want to do is to create a disc. Unfortunately, I don't know how to do this in Metasequoia. So the technique above is what I know...
Scale down the disc along the Y-AXIS a little bit. Don't over flatten. You just want to produce a mild oval shape.
Now, click on the "Magnet" button to bring up Magnet Toolbox. You'll want to set the magnet mode to the button pointed out by arrow #1 in the image above. Next, click on the right most point depicted by arrow #2.
Pull to the right! Notice how the segments are evenly distributed. What's more important is, the taper is smooth and consistent!
Almost there! Now use the scaling tool to flatten the shape along the Y-AXIS.
Now use the BEND tool to pull down the right most edge. Don't over do this.
Finally, use the EXTRUDE tool to create your wing!
Notice how much better this wing looks like compared to the one made using the cylinder+scale method?
In the past, I used to make wings using this method:
I start by creating a cylinder primitive with enough lateral segments to provide a smooth shape.
Then, using the scaling tool, squash the cylinder. This will produce what appears to be a wing. Close enough.
The next steps would be to reshape the cross section of the cylinder to produce the much sought after tear drop shape.
I start by getting rid of some segments at the rear of the wing. This is done by "joining" their vertices to the right most vertex. Arghh..hard to describe. Just look at the picture above. :)
Continue shaping the cross section (or chord) by moving the last segment pictured above a bit to the right. Then, using the scaling tool, scale down along the Y-AXIS to make the chord taper down smoothly.
Finally, move down the segments pictured above to refine the chord into the desired shape.
Simple eh?
Unfortunately, this technique relies a lot on a good eye to ensure that the chord tapers "naturally". Often times, you'll end up with something like this:
If you don't do a good job at aligning the segments of the cross section, you'll end up with a wing chord that looks like the picture above. Not really nice.... However, I'm not saying that the technique described above is flawed. I'm just saying that it's easy to make mistakes.
In my Heinkel P.1078B, I explored using Catmull-Clark patches for creating a smooth chord. It did its job well, but unfortunately, I had limited control on the number of wing segments. As a result, the leading edge of my Heinkel's wing is not very smooth.
Enter the Magnet tool!
Start with a cylinder primitive. This time, use more segments. This will help produce a smoother chord.
Now, delete the rear end of the cylinder as pictured above. Actually, what I want to do is to create a disc. Unfortunately, I don't know how to do this in Metasequoia. So the technique above is what I know...
Scale down the disc along the Y-AXIS a little bit. Don't over flatten. You just want to produce a mild oval shape.
Now, click on the "Magnet" button to bring up Magnet Toolbox. You'll want to set the magnet mode to the button pointed out by arrow #1 in the image above. Next, click on the right most point depicted by arrow #2.
Pull to the right! Notice how the segments are evenly distributed. What's more important is, the taper is smooth and consistent!
Almost there! Now use the scaling tool to flatten the shape along the Y-AXIS.
Now use the BEND tool to pull down the right most edge. Don't over do this.
Finally, use the EXTRUDE tool to create your wing!
Notice how much better this wing looks like compared to the one made using the cylinder+scale method?
Blohm und Voss P.212.02 - part 01
For my next design, I decided to take it easy and tackle something a little bit simpler. Or so I thought...
I chose to create the Blohm und Voss P.212.02 fighter jet. The P.212.02 is the second of three proposals that the engineers at Blohm und Voss submitted to the RLM as a candidate for the emergency fighter program.
This aircraft was to have been powered by the Heinkel HeS-011 jet engine, which would have propelled it to an estimated speed of 1,030 km/h (NOTE: I have no idea how they calculated this....). It would have been armed with three Mk108 30mm canons.
For those of you who played IL2-1946, you probably know how much carnage a well placed 30mm round can do to a B17.... imagine a trio of these.
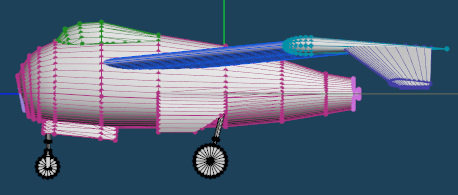
Here are some screen shots of the initial wireframes:
As with my previous models, I will stick to my scale of 1:48. I also plan to do the wheel wells as well as the landing gears. Unfortunatley, I'll still be staying away from doing the cockpit for now. :)
I'm also going to stick with Metasequoia as my modeling tool. Textures will be done using Inkscape. Unrolling will be via Pepakura.
As always, my main reference will be the Luft46 site. I also purchased an e-copy of Reichdreams Dossier #15 which also has a lot of data on the BV P.212.02.
Labels:
aircraft,
blohm und voss,
card model,
design,
luft46,
P.212.02
Subscribe to:
Posts (Atom)