Sunday, August 24, 2014

Heinkel P.1080 - Part 03

Broken Wings


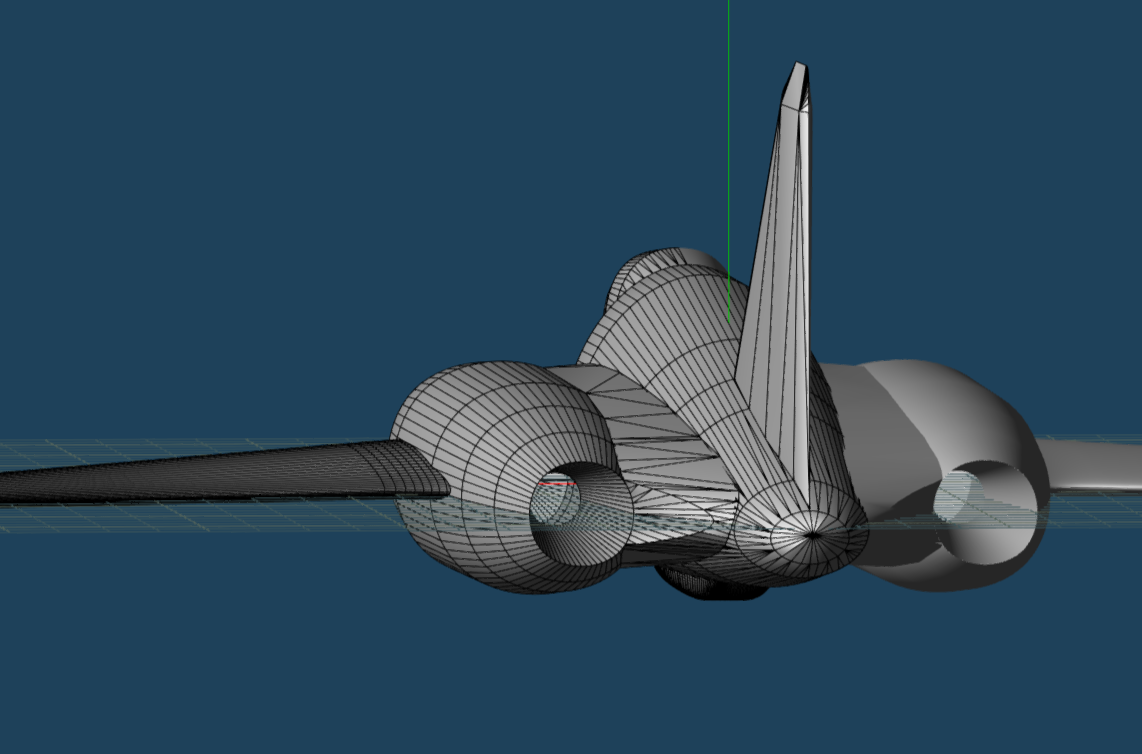
Arrgh!!!! As I was simplifying the wings, I noticed something bad.  The chord of the wings are symmetric on top and bottom.  Bad...  

I need to start over.

That's more like it!

Unfortunately, I lost precious hours working on the previous wing before I realized my mistake. :(

Saturday, August 23, 2014

Heinkel P.1080 - Part 02

Converting the Patch Surface into Wire Frames

In my previous update, I stopped just after I finished creating the spline/patch surfaces that comprised the model.  
Next, I converted that into an actual wire frame that I can edit.


Notice again that excess portions of the wings and the engine fairing are inside the engine tube.  
A series of boolean subtract operations are needed to remove the excess portions.

Boolean  

After the boolean substract operations, you'll see that the junk in the engine tube have been removed.  Also, you'll notice that the edges where each main part intersect are now clean.

Engine Details 

With the engine tube cleaned up, I could now add the ram jet's inlet cone and supports.

Notice that the engine tube's cross section isn't a perfect circle.   I think this is a side effect of the spline/patch tool of Metaseq.  Anyway, it shouldn't be a major issue once the model is assembled as an actual card model.

Cleanup

At this point, the model looks really nice.  But it's far too complex to use for producing card models.
The next step involves carefully removing edges at key areas, making sure stay close to the original shape.

Still not done, unfortunately.  The wings still need work.  But the image above should show you how the model "should" look like once it's built in cardboard.


That's all for now.

Friday, August 22, 2014

Coffee Break!

As I was in the process of simplifying the wire mesh of the P.1080, I suffered a mind blank.  I guess I needed some coffee.
I grabbed my cheap bank giveaway tumbler.  It had a paper insert that bore the logo of the bank.  It was misaligned.  I got a bit annoyed and decided to dismantle the tumbler to align that slip of paper.
Then I realized --- why the hell am I doing this?  Why not make my own design?

And make one I did!  Hahahaha.  

Now, my tumbler has leveled up!  I bet my coffee would even taste better after this upgrade!

Wednesday, August 20, 2014

Heinkel P.1080 - Part 01

Alive!

It's been a while since my last update.
Unfortunately, although I tried in vain to resume work on my FW VTOL design, I found some 'problems' that me to re-do some of the main parts.  I got a bit discouraged.   So, to heal my bruised ego, I decided to temporarily put that project on hold, and start a new project.  This time, I'll pick a simpler design--- one that does not require a lot of fiddly parts like wheel wells, and landing gear struts.

The Heinkel P.1080

This fighter aircraft is a powered by two Lorin-Rohr ramjets.  It is also armed with a pair of MK108 (30mm) cannons.  
Like the ME163 Komet, the P.1080 has no landing gear.  Take-offs are done with the help of a trolley for taxiing, which is then dropped just as the plane is airborne.  Landings are done with the help of a skid under the main fuselage.
Unlike the rocket powered ME163, the ramjet powered P.1080 has no static thrust.  Ramjets require a minimum speeds before it can ignite and produce its own thrust.  Thus, the P.1080 is also equipped with 4 rockets for taking off.  These rockets provide the initial thrust to reach the minimum speed required to ignite the ramjets.

Prep-work

Before starting, I grabbed the P.1080 3-view diagram from www.luft46.com.

Metaseq View Panel setup

Standard procedures... :)  Nothing much to say here.

3D View Template


While trawling the Google Sketchup forums, I found a really neat tip that the Sketchup users use for transforming 3-views into 3d models.  They take the top and side views of the model and load them as part of the model.  The top view would lie flat on the X-Z plane, while the side view on the Y-Z plane.

This could be emulated in Metasquoia by creating two rectangles and UV-Mapping the top and side view images onto them.

Low Polygon Modelling

This plane has a lot of curves.  Curves are very hard to model directly.  It would be far easier to create curves by using b-spline patches.
Once the low poly model is done, I can let Metaseq generate the real wireframes.  From there, I can remove the excess edges and vertices to produce a model that is suitable for cardboard.

The Fuselage

The fuselage will be the main structure of the model.  All other parts will be attached to this.

Cockpit


Just another blob on top of the fuselage :).

Engines

I'll go into more details about the engine later.

Fairings


Next, I create the fairings between the fuselage and the engine.

Rudder

Then the rudder...

Wings

Then the wings...

Skid

And finally, the landing skids.
Now, you'll notice that there appears to be a lot of junk inside the engine intakes.  These waste parts will be removed later on as I add more details to the engine.


Tuesday, May 20, 2014

Focke-Wulf VTOL - Part 8


 Hmm...something's gone wrong.  The pictures are gone.  I think I may have overdone my G+ Photo Album maintenance.  I'll fix these as soon as I can.

 Alpha Build Started!

Oh boy.  It's been more than a year since I've unceremoniously stopped working on this.  When I re-opened my metaseq work files, it took a while to get re-acquainted with the stuff I've left behind.

So now, I'm at this point where I need to design the spinner shafts (because I want the propellers to spin), the landing gears and the weapons (I'm planning to place a couple of guns on the wing roots, and a couple of ordinance pods).

But before I dive into that, I'd like to stop first and check if the model is buildable!  :)

So I fired up pepakura and did an unfold of the fuselage and the formers.

The Formers

I am not particularly fond of designing formers.  It's hard to guestimate the correct size of the formers.  Often times, the formers will turn out too big or too small.

Another thing I dislike doing is making joining strips.

So I decided to do a bit of an experiment by combining two chores into one-- former+joining strips.

Unfortunately, I lost the pictures for this one.  Maybe when I get back to this project, I can post new ones.


Skinning the Structure

With the formers/joining strip structure assembled, the next step would be to wrap the fuselage skin around it.

The initial wrapping process was very tedious because the former/joining strip structure was not rigid.
But as I finished assembling more of  the fuselage components, it became a lot easier.


Friday, April 19, 2013

Focke-Wulf VTOL - Part 7

Some more progress!

For this update, I worked on the exhaust vents for the propellers.

Creating the exhaust vents


If you recall in my earlier posts, one of the leftovers from the Boolean operations I did in creating the hole on the fuselage was the bottom cover of the fuselage.

I did a Boolean subtract operation to cut the engine base from the fuselage bottom cover.

I then took the knife tool to divide the bottom cover into strips.  For consistency, I didn't do any fancy Metaseq voodoo.  I just made some guestimates and hoped for the best.

After cutting the strips, I rotated each by 70 degrees.


This is how it turned out.

How it looks so far


Here's how the exhaust vents look when attached to the main model

Top view. :)

To do

  • Landing Gears
  • Wheel Wells
  • UV Mapping


Thursday, April 18, 2013

Focke-Wulf VTOL - Part 6

A very, very short update.
I've been ridiculously busy with work lately that I barely have time to extract enough brain juice to resume my design.

But over the weeks, I've done very small steps.  A polygon here, a vector there, a slice here, a slice there.

Eventually, I was able to finish the propeller shaft, propellers and base.

I'm afraid I was not able to record the steps I went through to produce this.

But I should be able to make a write-up on those steps when I get more time.

But for now, here's the latest picture of the model:


And here's a picture of the spinner assembly:

I'll try to put provisions that would allow the spinners to rotate. :)

じゃ、またね。