Tuesday, June 29, 2010

Heinkel HE P.1078B - part 11

Finally!  Some progress!


I was able to complete the pilot pod.  Save for the canopy and the missing front wheel well, the pilot pod is the same as the weapons pod.  Hence, I won't show the picture anymore.

The picture above shows how it looks like, if it were already flying. :)

Here's a frontal shot. 


Side shot.  Notice that the front wheel well is missing. 


Finally, here's how the wheel wells look like. 

I tried to see how air worthy the whole design by gently tossing to my bed.  It was a bit nose heavy so it didn't fly far... but it did fly straight!  And there appeared to be a semblance of lift after the initial toss.  But I didn't have the guts to throw it hard though so I can't confirm if the wings do generate lift. :)

Next up... the landing gears, then

Sunday, June 27, 2010

Heinkel HE P.1078B - part 10

I got a response from Tamasoft (Pepakura).  It turned out that there's an option that automatically joins 'nearly' adjacent edges.  Sometimes that function causes those edges to shorten a bit.  I was told that I had to disable that option and repeat the unfold process.  I'm really amazed that they replied to my email on a SUNDAY!  Anyway, I'm really grateful for the support.  Thanks Tamasoft! :)

Now back to business.


I got to complete the left pod (weapons pod).  I chose to build that first because I know I'll have a helluva hard time given the fact that it has to accomodate two wheel wells. 
I assembled this tail first, working my way up to the nose. 
Installing the rear wheel well was pretty straightforward. 
Installing the front wheel well... well...heheheh.  I must have cussed and cursed so much it started to rain.


In the previous blog entries, you'll notice that there are two holes under the wings.  Those holes are meant to accomodate the bulge on the wheel well as shown in the picture above.


Dry fitting.  I gently ease in the pod to the wing...


Voila!  Fits perfectly! :)


Here's how it looks like with the center fuselage dry fitted as well.  Everything snaps into place.  And I've yet to apply glue!  Hehehe.  I'll finish the other pod first to make sure everything fits well before I glue them into place.

Saturday, June 26, 2010

Heinkel HE P.1078B - part 9 : Pepakura Bug?

Awww cripes!

In my previous blog entry, I mentioned that the exhaust tube was a bit small and I had to pad it with a roll of paper to make it fit properly.

I re-opened my Pepakura file and saw this:

Just by looking at the image above, it doesn't take much effort to see the circumference of the rolled tube above will not match that of the rolled cone below.

This is a real bummer!  I already emailed Pepakura support about this.  They've already replied but their suggestions did not work.  I sent them my PDO file for them to check out.  I hope this gets ironed out soon.

Heinkel HE P.1078B - part 8

After making the wings, the next step would be to work on the center fuselage.
No nasty surprises here.  However, since I used a whole lot more of segments (faces) for this model compared to my last ones, the glue tabs that Pepakura generated were almost as small as the tines of a comb. :D

This made cutting out the parts a real chore.

But surprisingly, those small glue tabs had a very nice side effect.  They soak up glue like crazy.  It made it really easy to join the pieces together.

Here's how the center fuselage looks like:

Actually, I had a slight problem assembling the exhaust.  The opening of the fuselage was too big.  I had to pad the exhaust cylinder with two rolls of paper to make it fit properly.  I'll have to look into this further.  In my Metaseq wireframe, the exhaust and fuselage are joined together in one object.  SO, in theory, pepakura should produce a good fit.  I'm hoping I made an error in assembling this.  I'd hate it if it was a bug in either metaseq or pepakura.

I'm now dry fitting the wings to the fuselage.

Fits perfectly! :D

The gaping holes on the side of the fuselage will be covered once I assemble and fit in the left and right pods.

So far so good!


Heinkel HE P.1078B - part 7

And the Eric Flugzeug-Werke's machines have begun to roll.

And already, I've experienced a lousy start. :(
I though I could get away with designing the wings without using formers.  Yeah right. 
After hours of wrestling with the paper, trying to get that stupid anhedral wingtip to assemble correctly, I got this sloppy excuse for a wing:


Man... that ain't gonna hold up.  It looks like it was made out of tissue paper.

I had to go back to the drawing board and whip up a set of wing formers..pronto!

And here's what I got:


I'd say they look darned good! 
I then reprinted the diagrams for the wings.   After cutting and wrapping them around these formers, here's what I got:


Pretty darned good improvement over the first wing prototype.  And sturdier too!


A little rest before I start with the fuselage.

Monday, June 21, 2010

Heinkel HE P.1078B - part 6


Done with unfolding!  Dang, there are just about a bajillion pieces to assemble.  I really hope Pepakura did a good job at making these pieces fit together...

Sunday, June 20, 2010

Heinkel HE P.1078B - part 5

Landing gears and wheel wells done!
It took a lot of effort to adjust the scales of the landing gears to get a good fit without compromising the overall visual proportions of the model.

The picture above shows how the landing gears would fit inside the weapons and cockpit pods.  Very tight fit indeed.  Note that the weapons pod should also contain three 30mm guns!  I don't know how I'll fit that one in.  But there IS still space left between the front wheel wells. :)

Here's how it looks like from the side with the wheel covers. 

Ready for take off!  Man... had this aircraft been produced, it would have looked really badass.

I'm thinking of whether or not to put the gun pod holes, or just paint it as a texture.

Saturday, June 19, 2010

Heinkel HE P.1078B - part 4

Done with the boolean operations.  Here's how I cut apart the components that would comprise the plane:

The wing would be the main piece.  I'm thinking that if I can make the internals of the wings strong enough, I might not need to put formers on the fuselage parts....hmmm...


The gun and pilot pod will be "wrapped" around the wing. 

And the same goes with the main fuselage.


With that done, it's time to work on the landing gears:


It may appear symmetrical in the image above...but the front landing gear ain't.  The wheel is a bit off center, and the strut leans heavily to the left.


Now here is where I hit my first major snag.... damn!


To carve out the wheel wells, I 'simulated' raising the landing gears.  That way, I'll have an idea how big a cavity I'll have to create on the fuselage of the plane.  As far as the width of the fuselage is concerned, the gears fit well.  But when the length comes into play, the rear and front gears don't fit!  I'll need to scale down the gears a bit before I can continue.  :(

Anyway, here's how the plane looks so far, sans the wheel wells.


Friday, June 18, 2010

Heinkel HE P.1078B - part 3

Let's rewind a bit.... I'll show how I made the fuselage.

I wanted to experiment with the Spline / Catmull patch function of Metaseq, and got mixed results.

I starte by 'trying' to make the fuselage this way:

After many attempts, I couldn't get anything close to what was illustrated in the 3-view design over at Luft'46.
I finally gave up on the Spline/Catmull idea and used a traditional approach:
As seen on the image above, I started by making the engine housing, which will also comprise the centerline of the fuselage.


Not wanting to give up on the Spline/Catmull concept, I tried it again, this time on the wings.  And surprisingly, it turned out pretty well!    Once satisfied with the general shape of the wings, I converted the Spline/Catmull patch into a wireframe.   I then did some minor adjustments, aligned some vertices, and folded down the wingtips.


Voila!  Instant wings!

Pilot / Gun pod creation was also standard fare:

Note that I only had to create the left pod.  I then told Metaseq to mirror the object along the Z axis.

Putting it all together brings us to the image I had in my first blog entry:

Heinkel HE P.1078B - part 2

A little progress....


I made the air intake by extruding the front of the fuselage forward.  I then pushed the extruded surface inwards into the fuselage to make the intake.  So far so good.

I also threw in the wheels.

Before I proeed to do the object boolean operations, I also made some minor adjustments by aligning key vertices.  This should make the boolean operations a bit "cleaner" later on.

Heinkel HE P.1078B - My first foray into asymmetry (part 1)

For my next model, I'm going to take a shot at an asymmetrical design, albeit a mild one.  The name of the aircraft is the Heinkel HE P.1078B.  You'll find more details about this nice aircraft at the Luft'46 site.

After so many failed attempts at estimating the shape of the main fuselage, I finally came up with something visually satisfying.

I'll stop here for now....

Sunday, June 13, 2010

Lippisch P.13a

The Lippisch P.13a is a very interesting Luft'46 design.  Had this thing been built, it would have been made mostly out of wood.  It would have been powered by a ramjet engine that uses powdered coal as its main fuel!  To get this thing up to speed to make the ramjet work, it would have used a small version of the rocket engine used by the ME163 Komet. 

It had no landing gears.  Instead, it uses three landing skids.  I therefore assume this aircraft required a grassy surface to land on.  Asphalt or concrete would have ruined the skids.

Wind tunnel tests shows that the frame of the P.13a could reach Mach2.

It would have been armed by a pair of 30mm cannons.

I designed the wireframes using Metaseq.   The unrolling/unfolding, I used Pepakura.  Finally, the skins were made using Inkscape.

I. Building the main fuselage 

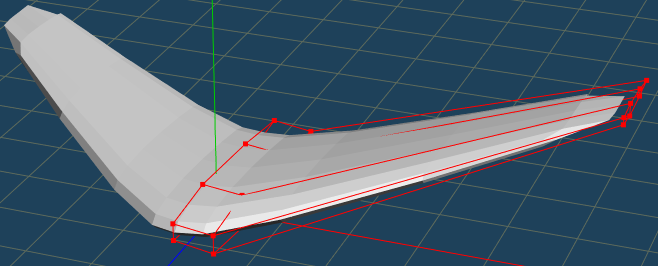
I originally designed the main fuselage using the traditional lateral and horizontal spars.  Unfortunately, although they did the job, it was terribly difficult to assemble the left and right outer skins.  I experimented a bit by using the accordion like spars seen in the picture above. 

As you can see, the accordion like spars provide enough volume and as a side effect, it prevents the glue tabs from folding inwards.  This 'should' make attaching the other half of the fuselage a lot easier.


And hey, it works!

II. Building the wings
Now, on to the wings. 

Unlike the fuselage, the traditional spars worked quite well. 


 Wings done!

III. The rudder / cockpit

Like the wings, the rudder is comprised of three spars.  That small tube shown in the picture above is the booster rocket exhaust.

Make sure to insert the spars into the rudder/cockpit first before you attach the rocket booster!


IV. Intake and Landing Skid
Some knick knacks.

V. Putting it all together

First, attach the wings to the fuselage. 

Second, attach the rudder/cockpit.

Third, the intake.

Lastly, the landing skid.  Note that it is important to attach the intake first before attaching the landing skid!


VI. The Trolley
Trolley assembly is pretty straightforward....


VII. All done!

For the camo, I used the RLM74/76/81 color scheme.  Squadron markings are of the JG52, with matching defense of the reich band.

There's something terribly wrong with the printout.  The colors are not supposed to be muted like this.  I think the blame lies on the card stock I used.  The card stock seems to react with the HP92/93 ink.


I thoroughly enjoyed designing and building this.  If you would like to try out my design, you can download the model from the following link: